My ZSA layouts
I’ve been a huge fan of ZSA for 4 years and counting. They are primarily a keyboard company and they sell three flagship, split keyboard series—two of which I own one of. I use a Moonlander for the home office and a Voyager for when I’m on-the-go. Both are designed to be ergonomic and aesthetic powerhouses that are highly customizable.
I don’t want this to be a blog post about the merits of split keyboards or the joy of mechanical keyboards even though this could easily spiral out of control into one. I want to talk about how I landed on the custom layouts that I’ve flashed on both keyboards and my thought process for their key placements. ZSA allows folks to customize and flash their own key layouts using their tool Oryx, and it’s been a lifesaver. I give props to anyone who uses the default layouts, but they are abhorrently unnatural.
Voyager
I want to start by talking about the Voyager. I’ve adjusted both my keyboard layouts to mostly be based on this board because it has the fewest keys, making it a common denominator of sorts. The Voyager handles three layers, and I’ve landed on the following:
Layer 0: Main (Voyager)
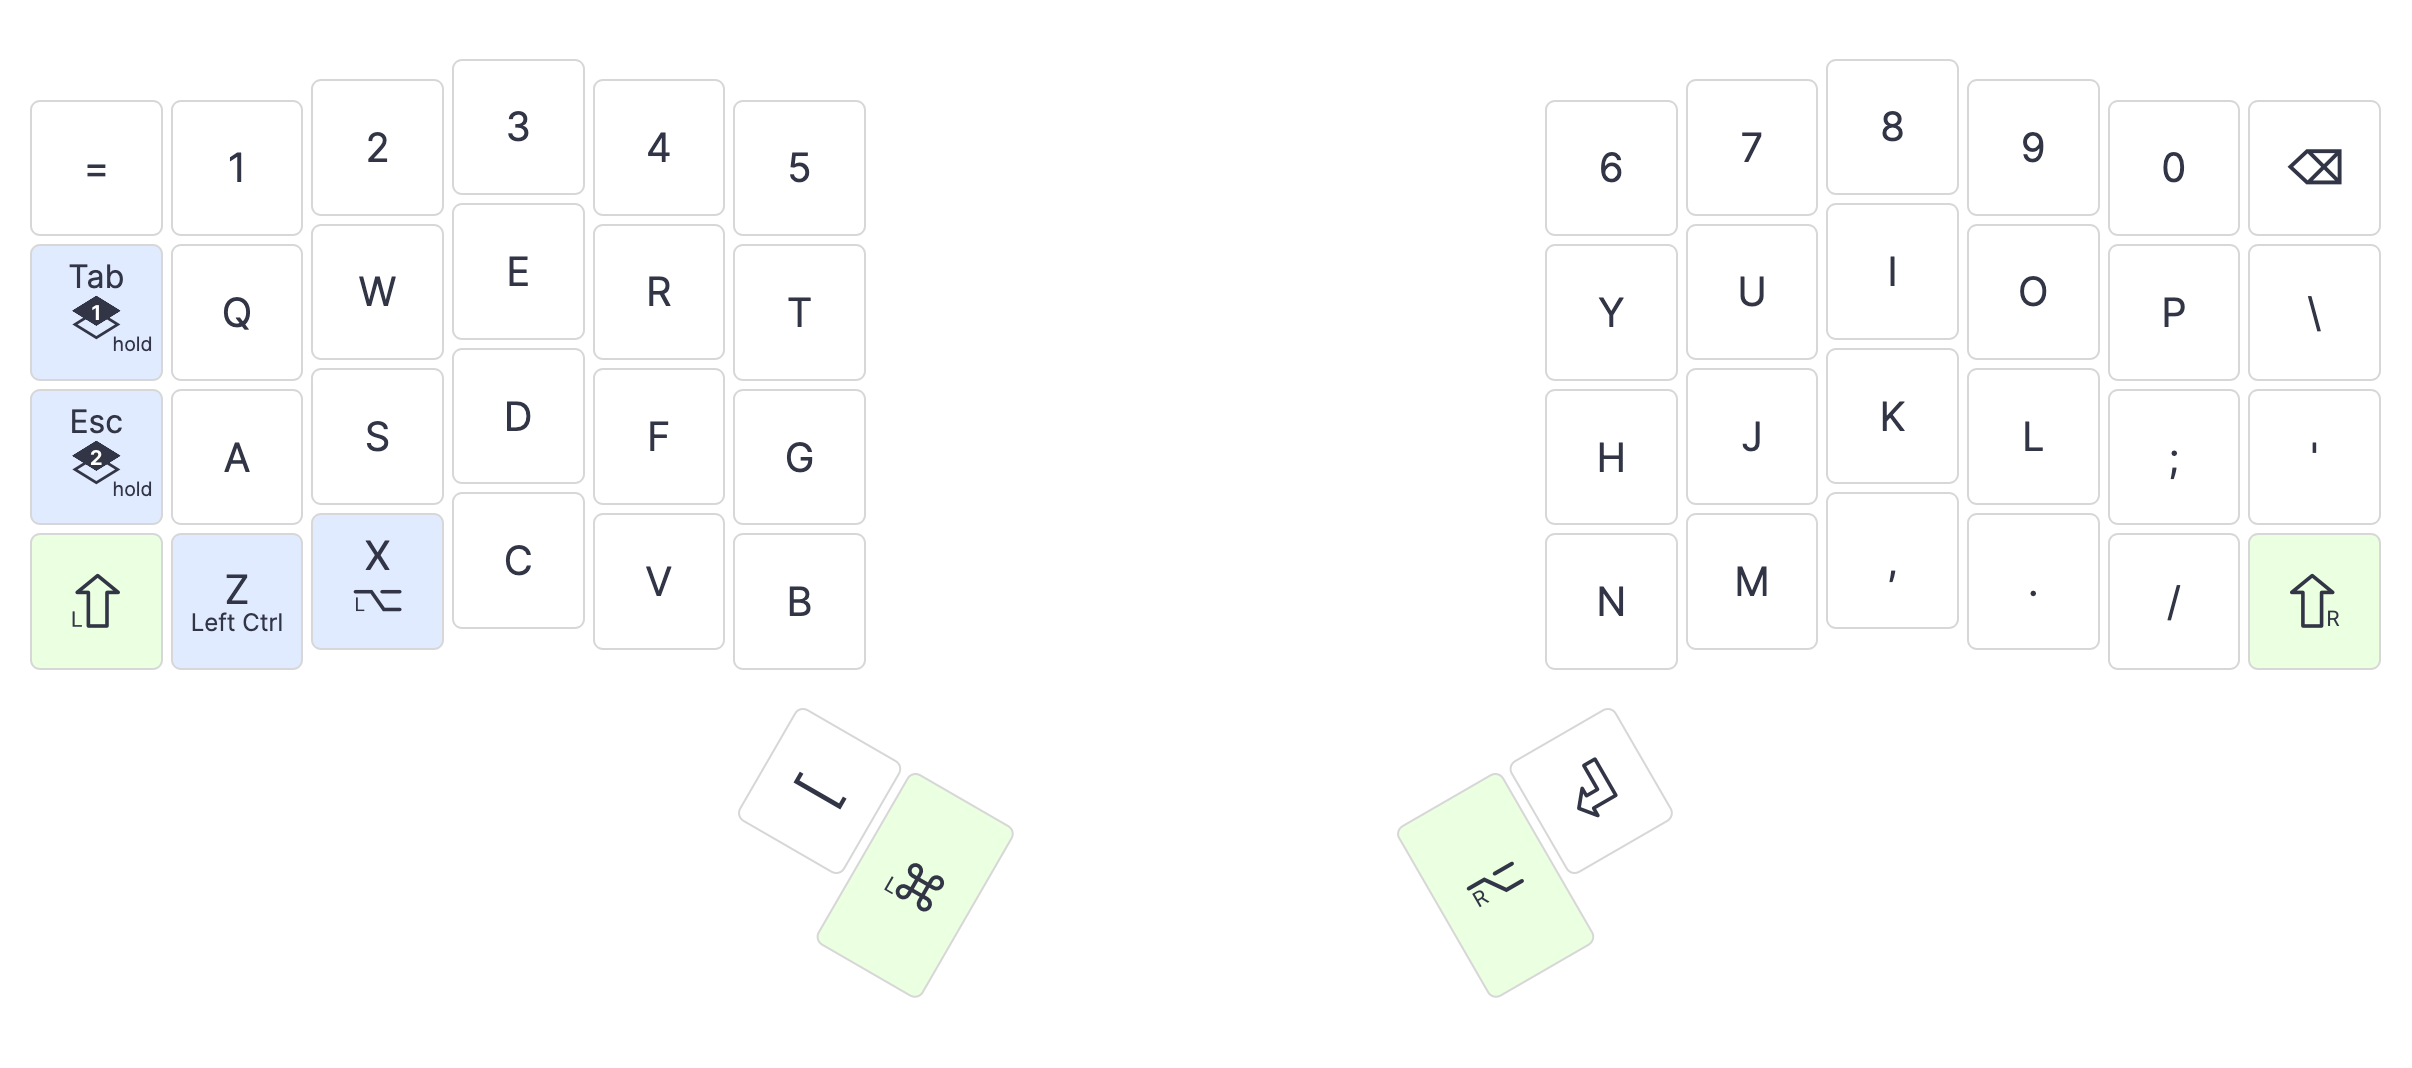
The first thing to address is the thumb keys. Unlike a traditional keyboard, the Voyager has 4 total keys available for your thumbs. I’m right-handed, so it only made sense for the top-right thumb key to be Return/Enter and the top-left to be Space. I set the secondary thumb keys to be Command on the left and Right Alt/Option on the right due to how frequently I use them and to somewhat mirror their placement on a more standard keyboard.
Due to its compact nature, I had to get a little creative with the placement of modifier keys. I have Command and Alt available via the thumbs, but I still needed access to Control. Oryx lets us customize a key’s function based on action taken: tapped, held, double-tapped, and tapped then held. So to closely mirror a standard keyboard, I’ve set Z to be Left Control when held and X to be Left Option/Alt when held. That way I don’t have to twist my brain when switching between ZSA and standard keyboards.
And the last thing I want to point out are the layer keys. These are keys that allow me to switch into the other two layers when held. My Tab key switches to layer 1 when held and Esc switches to layer 2.
Layer 1: Symbols (Voyager)
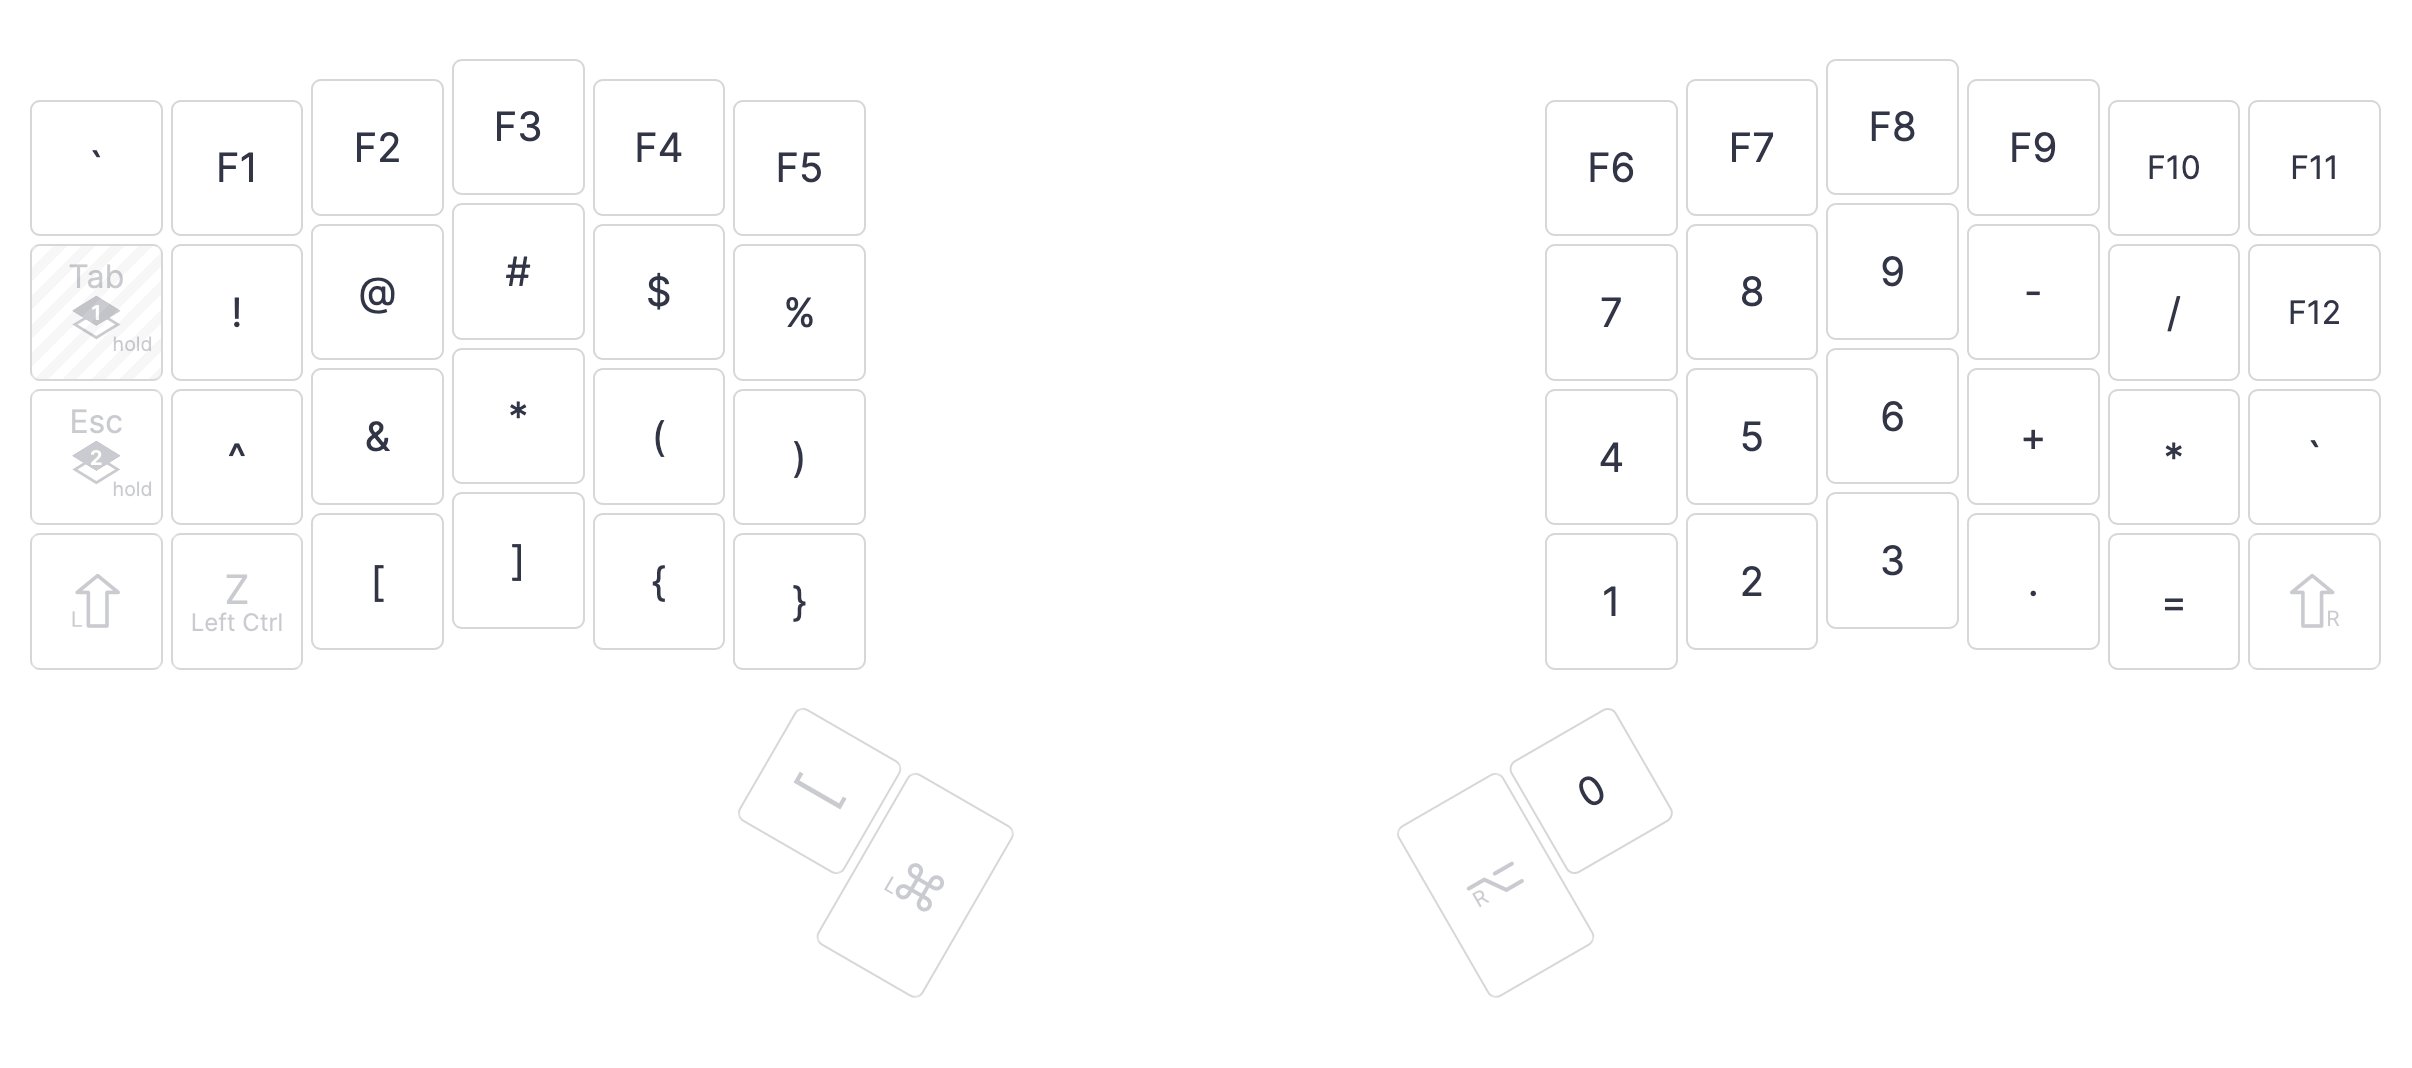
This layer enables three main things for me: common symbols, function keys, and the numpad.
The numpad lives on the left-most side of the right split, with 0 living on the top-right thumb key. There’s an argument to be made that the numpad should be shifted one column over to the right to be better aligned with home row hand placement, but I decided against that mainly to provide more comfortable access to the - key with my right ring finger.
I’ve duplicated the use of the ` key, one in the very top-left of the board and one where ' normally is. The top-left is to more closely emulate a standard placement of the key and the ' replacement is because that just made sense in my head. ' becomes " when using Shift, so it should evolve into ` when using layer 1.
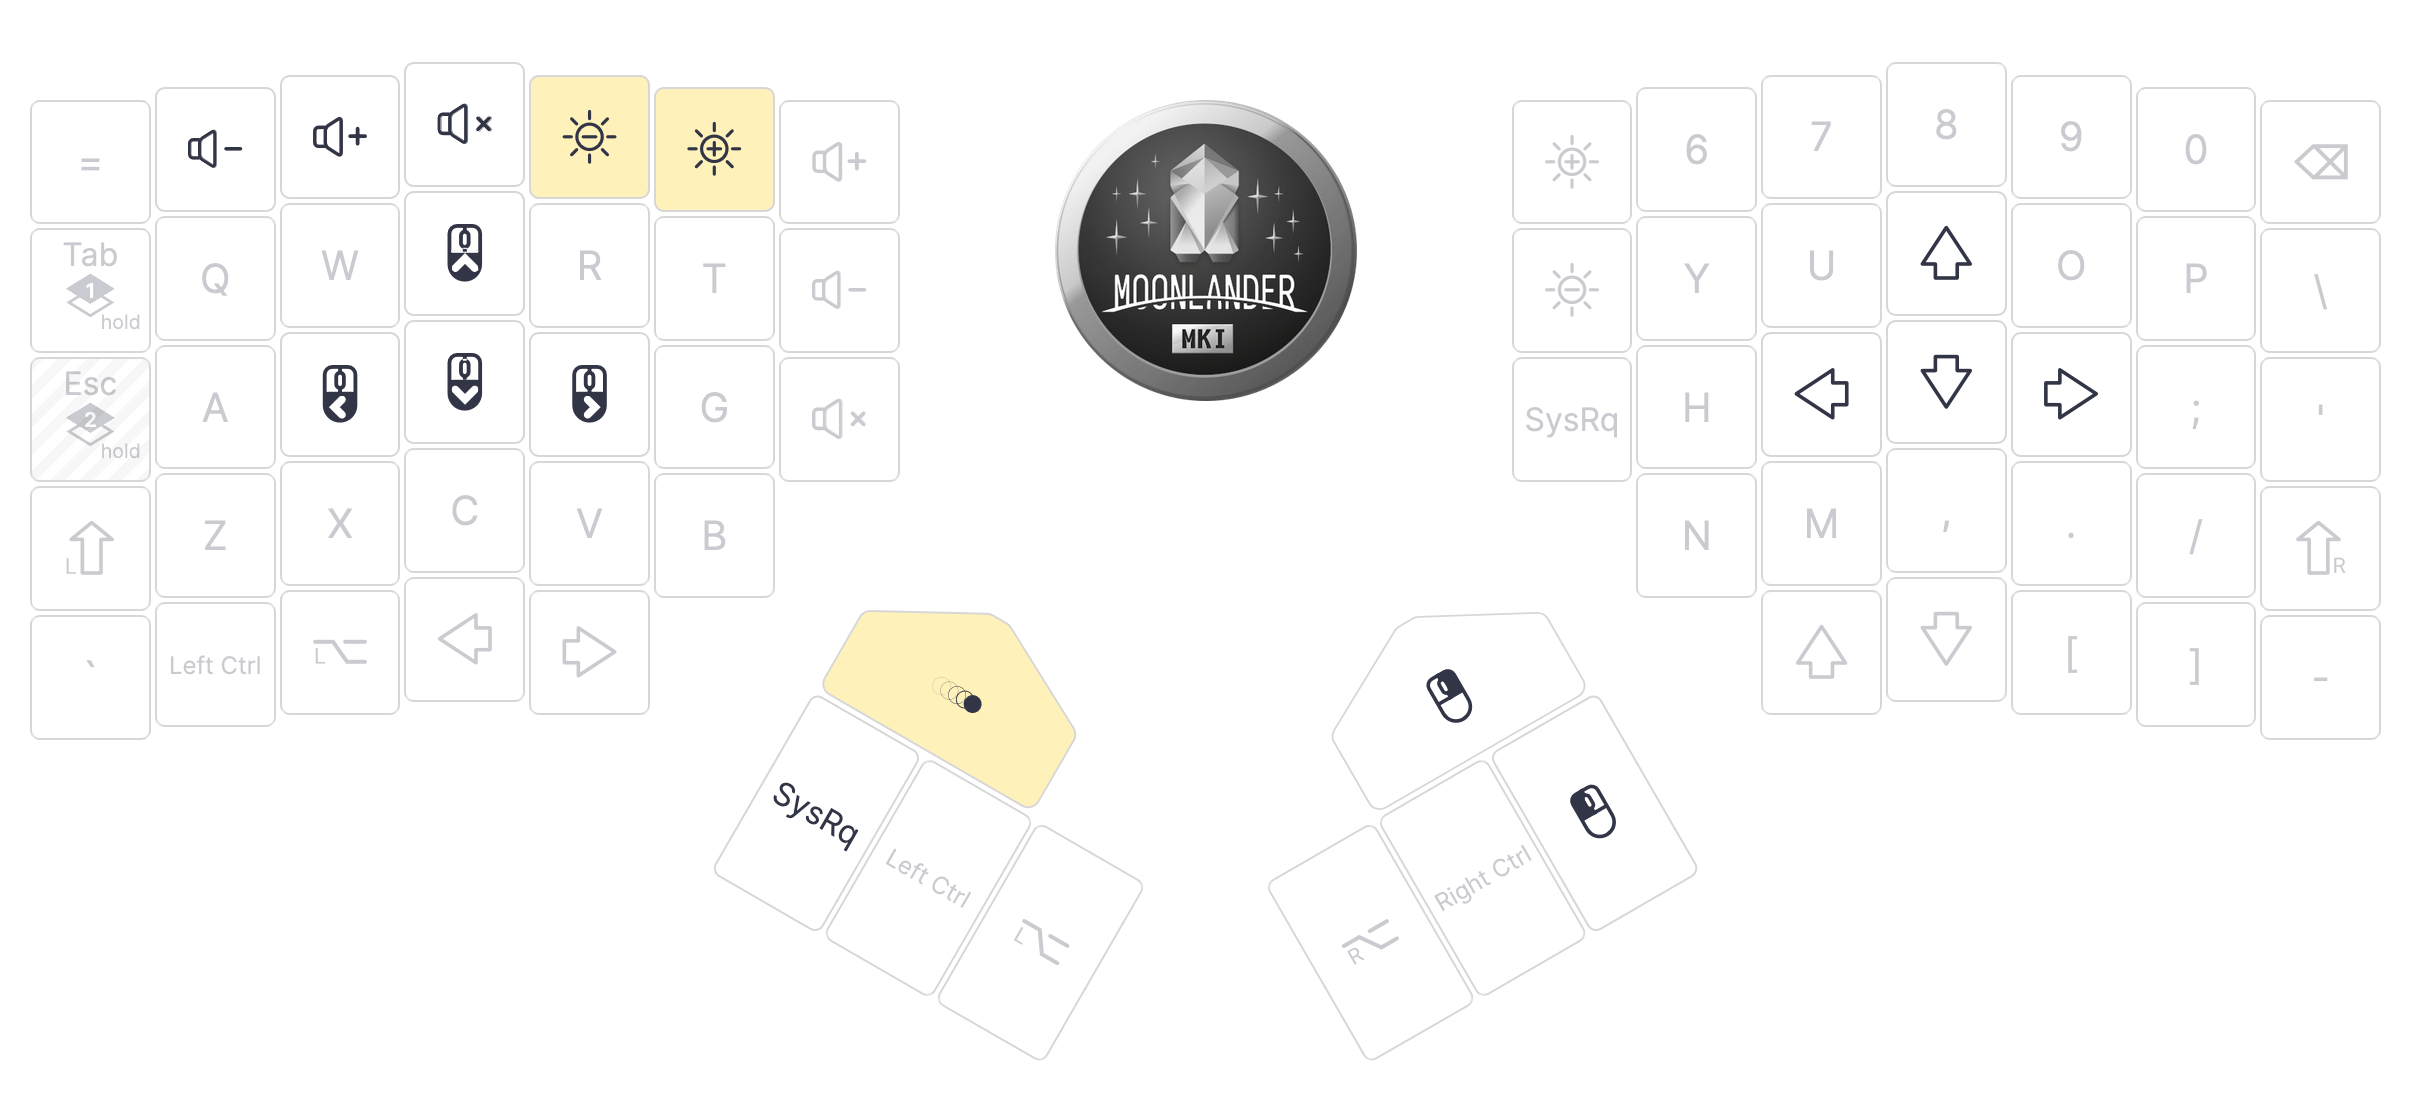
Layer 2: Media (Voyager)
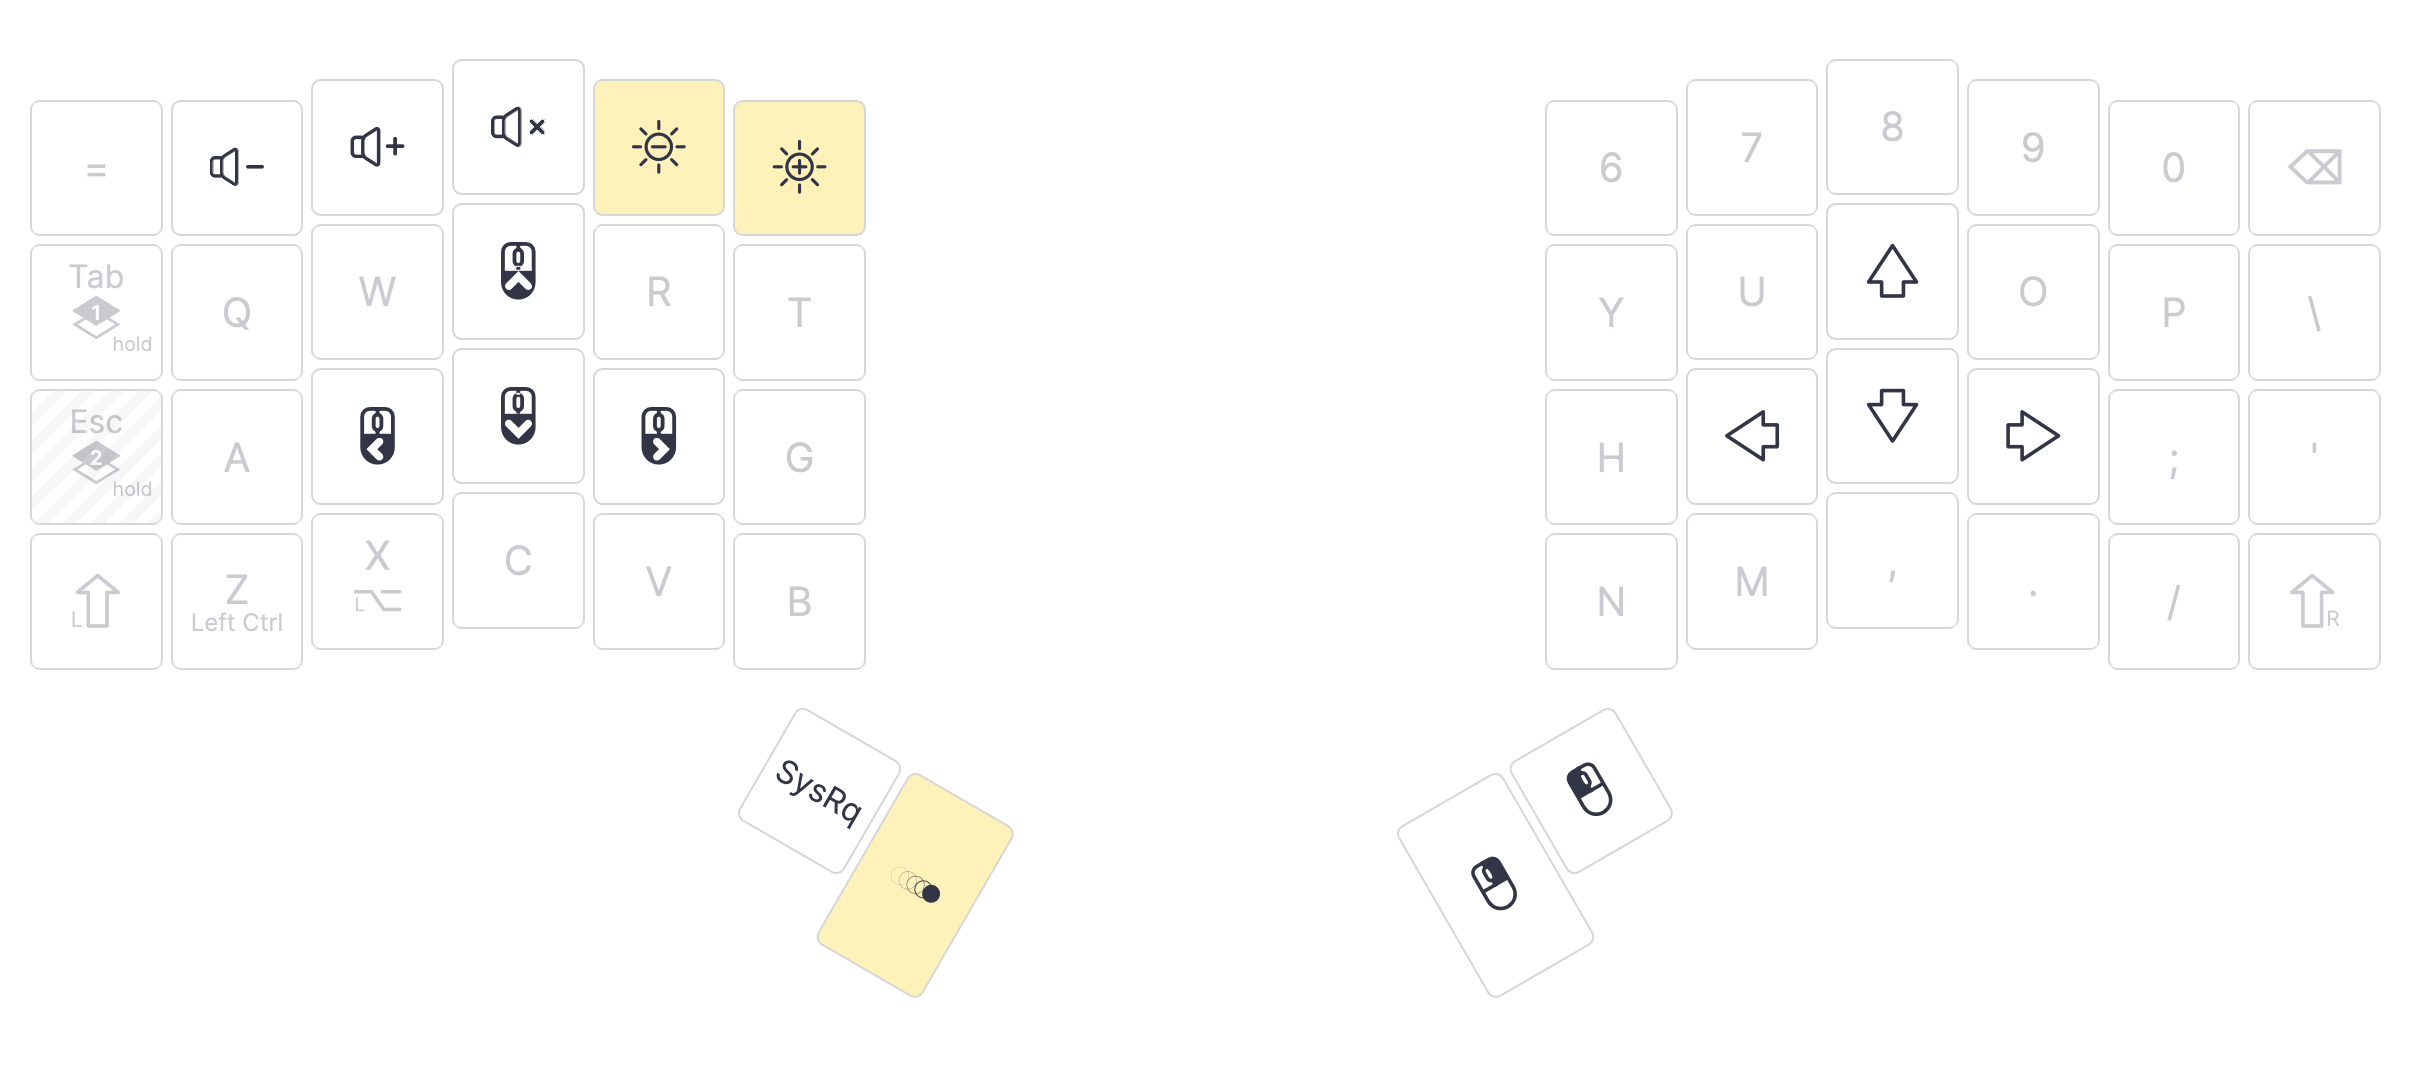
And finally, the media key layer. I don’t actually use media keys all that often, so this one is fairly sparse. The top row is lined with Volume Down, Volume Up, Mute, Brightness Down, and Brightness Up-the only media keys I actually use.
On the right split, I have arrows keys lined up with my fingers in natural position to somewhat follow the placement of arrow keys on standard boards. On the left split, I have mouse movement keys in case I ever end up in a situation where I don’t have a mouse or trackpad available to me. The primary right thumb key is Left Click and secondary is Right Click.
Finally, the left split’s primary thumb key is SysRq/Print Screen just so I have access to it at all and the secondary is Change Animation which is a ZSA-specific key that lets you cycle through its lighting styles.
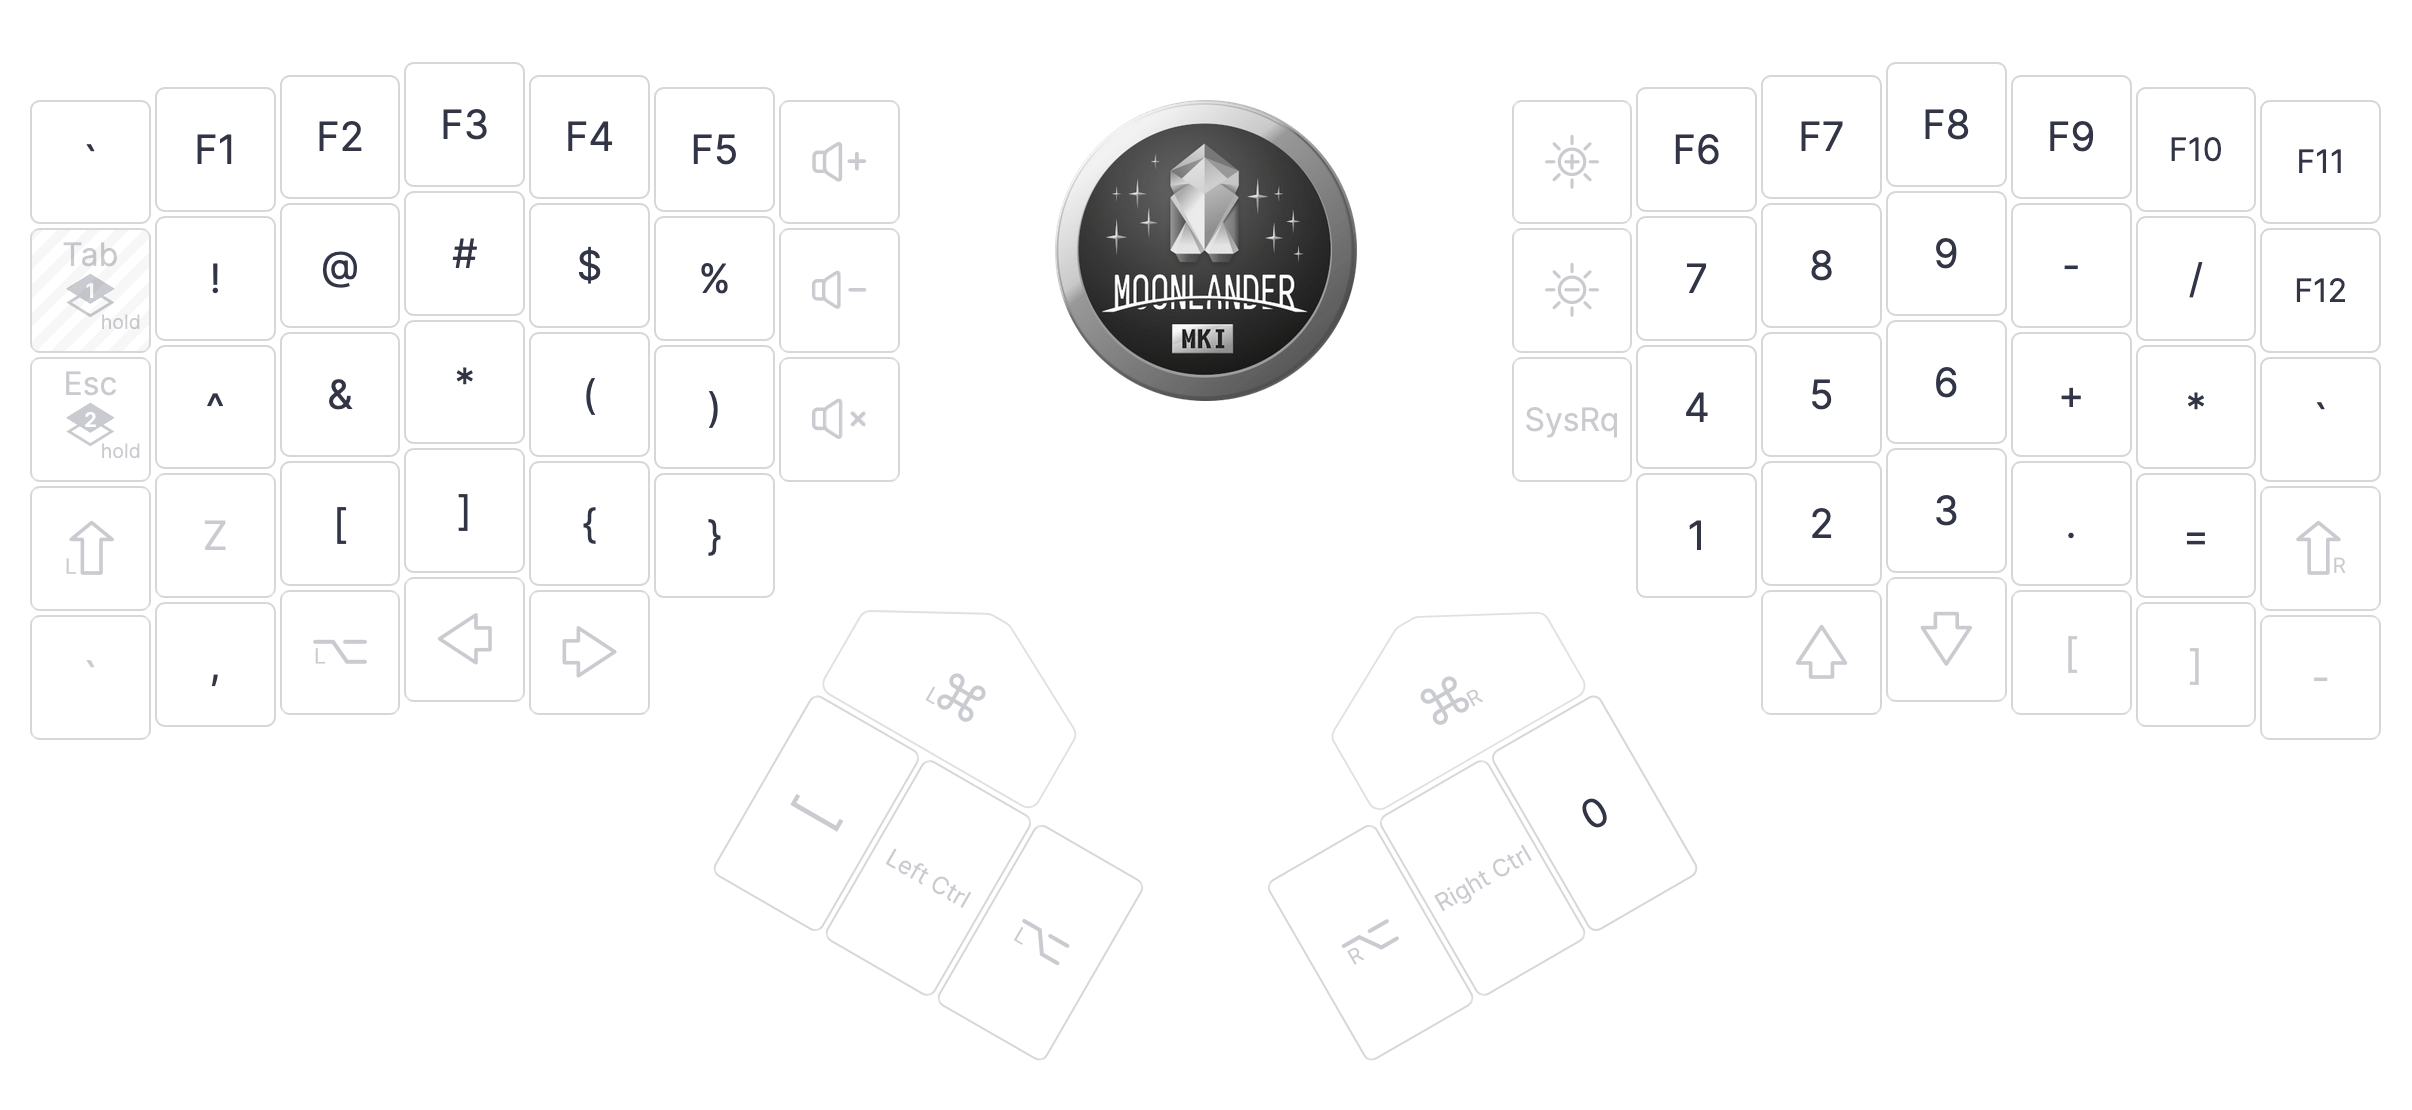
Moonlander
Now for the chonker, the Moonlander. As I mentioned above, I’ve heavily based this layout on the Voyager’s so that I don’t have to completely context-switch when switching between the two keyboards.
Layer 0: Main (Moonlander)
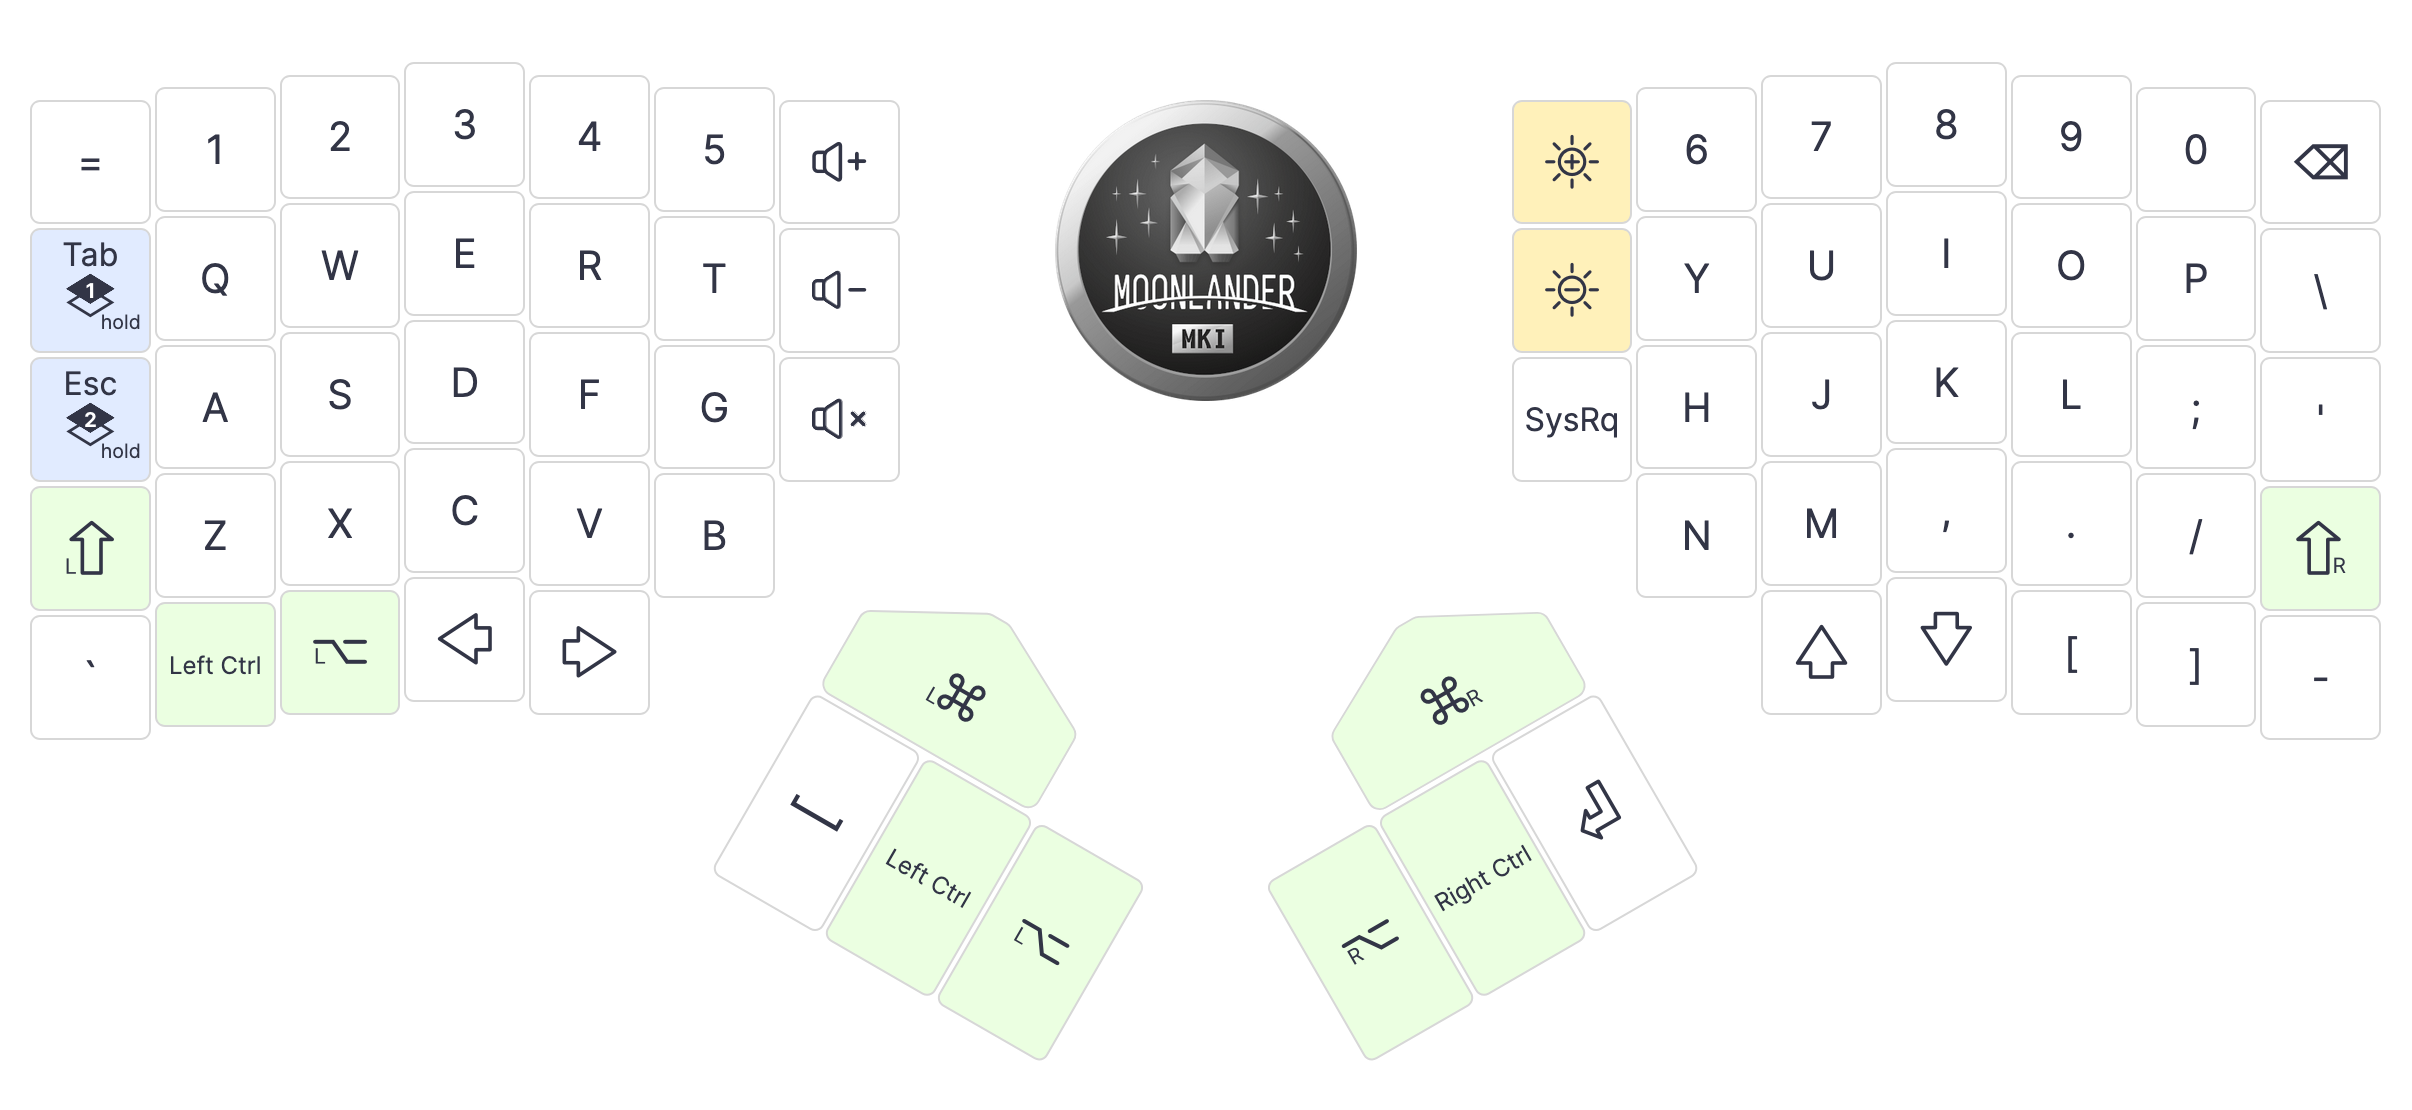
As you can see, it’s pretty similar to the Voyager’s main layout. The main differences are with the additional keys available. The thumb keys are arranged slightly differently and there are also more of them. Instead of 4 total thumb keys, we have 6, so I have them revolving around modifiers primarily.
On the left split, I moved Left Control and Left Alt/Option down one row because it’s available, and it’s accompanied by ` and left/right arrow keys which come standard on the Moonlander. The additional column on the right constitutes volume controls.
On the right split, the additional row contains up/down arrows, brackets, and -, which I believe is default. The additional column is configured with brightness controls and SysRq/Print Screen for convenience.
Layer 1: Symbols (Moonlander)
This layer is, I believe, identical to the Voyager’s, so not much to say here!
Layer 2: Media (Moonlander)
Similar to layer 1, this one’s also identical to the Voyager’s!
Downloads
If you’re a Voyager or Moonlander owner, you can download my layouts at the following links: Voyager and Moonlander. At the time of writing, I haven’t written any detailed revision messages, but I will make sure to do so from now on!
If you have any questions or would just like to start a conversation with me, I’m happy to engage over email or the fediverse.